Clump foliage is one of the easiest scenery materials to use when you want to add realistic bushes, hedges, shrubs, trees and rough vegetation to a model railway layout or diorama. A bare embankment can quickly become overgrown, a simple fence line can become a convincing hedge, and a plain tree armature can be turned into a leafy tree canopy.
For model railway scenery, clump foliage is especially useful because it adds instant height, texture and depth. It is not just a flat scatter material; it has body. That makes it ideal for creating the sort of lumpy, uneven, natural growth seen along railway cuttings, rural lanes, field boundaries, woodland edges and neglected sidings. For more general scenic groundwork, it also pairs well with static grass and other model railway scenery materials.
Whether you are building a small countryside diorama, an OO gauge branch line, an N gauge layout, a military scene or a dense woodland edge, clump foliage is a versatile material worth keeping in your scenic supplies box.
Table of Contents
- What Is Clump Foliage?
- What Can Clump Foliage Be Used For?
- How to Use Clump Foliage: Step-by-Step Guide
- Choosing the Right Colour of Clump Foliage
- Pro Tips for Realistic Clump Foliage
- Clump Foliage vs Other Scenery Materials
- Recommended Tools and Materials
- Troubleshooting
- Conclusion
What Is Clump Foliage?
Clump foliage is a scenic modelling material usually made from coloured foam or sponge-like ground-up foam, coloured with dyes or acrylic paints. It is supplied in irregular chunks or clumps, which straight out of the packet have a bush-like shape, but can be torn apart and glued into place to represent leafy vegetation.
The key difference between clump foliage and fine scatter is the volume of the pieces. Fine scatter lies close to the surface and is useful for low ground cover, moss, earth tones and subtle colour variation. Clump foliage is much chunkier and more suited to making bushes, shrubs, hedges, trees and rough lineside growth.
It’s available from several well-known scenery brands such as Javis, WWScenics, etc. But our favourite, mainly due to the larger range of colours available, is Woodland Scenics. It’s not the cheapest, but you have a wider choice of shades to suit different seasons, which we’ll get to shortly.
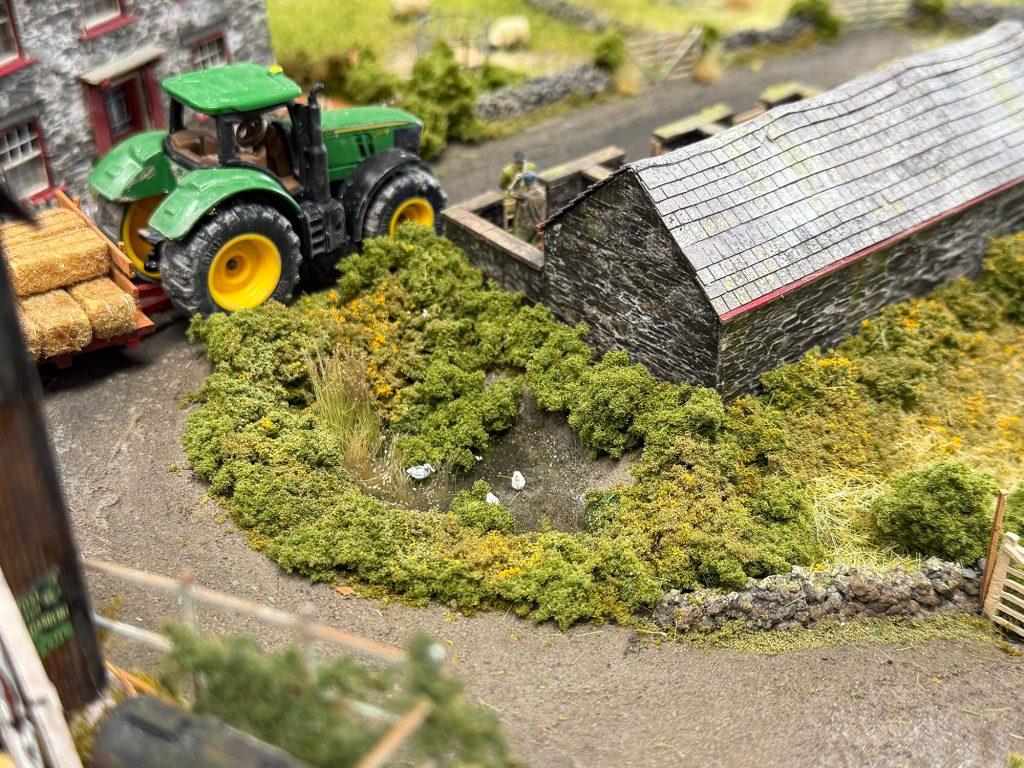
In the example below, a mid-green clump foliage has been used to soften the edges of the farm pond, then dressed with a little fine flock foliage in burnt turf and yellow to mimic finer leaf foliage and flowers.
What Can Clump Foliage Be Used For?
Bushes and Shrubs
The simplest use for clump foliage is making bushes and shrubs. You can either use a piece straight from the packet or tear off a small piece, shape it lightly with your fingers and glue it into place with PVA or any other scenic glue. This can quickly add life and a bit of dynamics to empty corners or flat areas of a layout.
Bushes are particularly effective around fences, station buildings, gardens, goods yards, allotments, field edges, riverbanks and the base of trees. They are also useful for softening hard scenic joins, such as where a building meets the ground or where a road meets a grass verge. This makes clump foliage a very handy tool in your arsenal when you’re trying to hide baseboard joins or improve older scenic areas.
For the most natural look, avoid using pieces that are too identical unless you’re going for the manicured hedge/bush look. Don’t forget that bushes vary in size, colour, density and shape too… so it’s well worth paying attention to real bushes & trees while you’re out and about (or use Google Images). Look at the shapes, heights and colours, then use a scale ruler to get a rough idea of how big the chunks need to be. Mix small, medium and large clumps, then blend the base into the scene with fine turf, static grass, weeds or earth scatter. This will make such a difference… rather than looking like it’s just been plonked there, it will have a much more natural look. Again, use the real world for reference.
Hedges and Field Boundaries
Clump foliage is excellent for creating hedgerows on rural model railway layouts and dioramas. If you’re out and about in the countryside, you’ll notice some hedges are 4 of 5 ft tall, some well over 15ft! And they definitely won’t be uniform, unless they’ve recently be trimmed by the local land owner. A simple line of naturally shaped foliage can easily create a satisfyingly natural-looking hedge running beside a country lane, around a field, behind a platform or along a railway boundary.
For a basic hedge, apply a thin line of PVA glue, scenic glue or Anita’s tacky glue, but enough so the clump foliage has something to cling to while it dries. Then press torn, random pieces of clump foliage gently into the adhesive. Don’t press too hard otherwise, being spongey, the foliage may spring back too far and part company with the glue. I’ve done that many a time… So you need a decent amount of glue… but don’t make the line too wide. Once dry, the hedge can be carefully trimmed with scissors, coaxed into subtly different shapes (but don’t pull it too hard, otherwise it’ll come unglued) or blended into the surrounding scenery, as mentioned, with scatters, flocks and scenic powders, etc.
Don’t forget where you’re modelling. A neat, even hedge works well for gardens and maintained boundaries, while a rougher, more irregular hedge is better for farmland, rural lanes and older countryside scenes.
For more ideas, see how to make model railway hedges.
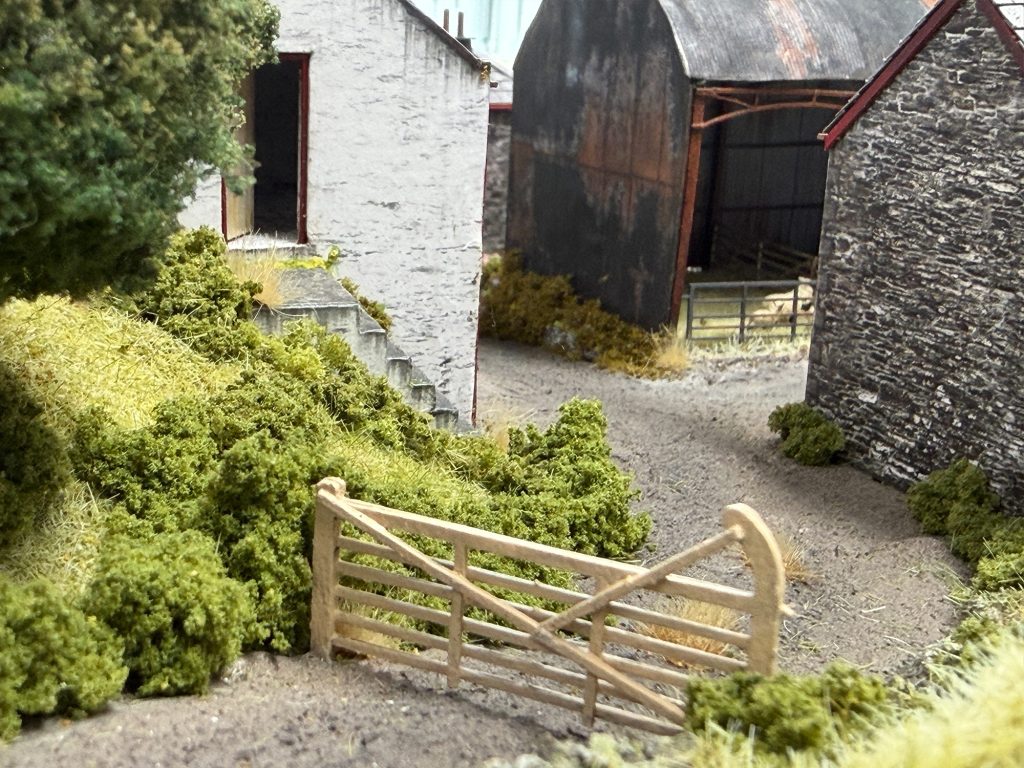
In the photo below, a mid-green clump foliage has been used to soften the edges of the farm drive, with a few static grass tufts interspersed.
Tree Canopies
Clump foliage can also be used to create leafy tree canopies. It works well when attached to plastic tree armatures from companies like Woodland Scenics, handmade wire tree frames (easy enough to make from a bit of old electrical flex), seafoam branches or small natural twigs.
The trick is to build up the canopy gradually with smaller chunks rather than. Avoid covering the entire tree in one solid lump of foliage. Real trees have gaps, shadows and uneven branch structures… they rarely look like lollipops, so use several smaller pieces and leave some openings where the branches can show through. For a more detailed method, see how to make model trees.
Railway Embankments and Cuttings
Railway embankments and cuttings are some of the best places to use clump foliage. I recommend mixing up the colours depending on the season you’re modelling. Nature isn’t uniform, so grabbing a couple of complementary shades will make things look much more natural, but we’ll come to that shortly. Real railways often have a mixture of grass, weeds, brambles, shrubs and small trees growing along the trackside. Clump foliage is ideal for capturing that unmanaged lineside look you get with gorse bushes, small hawthorn trees, etc.
Start with a base layer of earth colour, scatter or static grass. Then add clump foliage in irregular groups, again paying attention to the real world… Once more, Google Images is your friend here. Use darker greens at the rear or lower down, and lighter greens toward the front or top as highlights. This helps the vegetation look deeper and more natural. Learn how to make realistic railway embankments here.
Woodland Edges and Undergrowth
A row of model trees can look bare if the ground beneath them is empty. Unless you’re modelling a pine forest, woods rarely just have tall trees. There’s brambles, holly bushes, smaller saplings and more, often all tightly packed into a relatively small space. Again, a quick walk in the woods with your phone camera can give you some great reference material. Clump foliage helps create the missing layer of undergrowth around tree trunks, woodland edges, shaded corners and fence lines.
Once again, it’s not about using that material alone either… clump foliage alongside fine turf, leaf scatter or forest floor blend scatter, twigs, static grass tufts and small weeds will help you create something that looks like Mother Nature crafted it all by herself. Think of the scene in layers… Low ground cover comes first, then bushes and scrub, then taller trees behind.
Dioramas and Wargaming Terrain
Clump foliage is not only useful for model railways. It can also be used on dioramas, military models, fantasy terrain, architectural models and display bases.
In a military diorama, it can represent hedgerows, bocage, overgrown ruins, woodland edges or rough countryside. On a vehicle diorama, it can soften the edge of a road, track or hardstanding. On fantasy and sci-fi terrain, it can be used for jungle growth, alien vegetation or dense forest scenery. .
How to Use Clump Foliage: Step-by-Step Guide
Step 1: Prepare the Ground
Clump foliage looks best when it is added on top of finished or semi-finished ground cover. Before adding bushes or shrubs, paint the baseboard or terrain surface in earth tones. Then add scatter, fine turf, static grass or soil texture. While doing so, use your reference images to create natural-looking layers. Doing the ground layers now is much easier than trying to get leaf scatter to fall naturally under a hedge once it’s in place! I’ve been there with this one… trying to use a piece of paper as a “slide” to get the scatter to land under the hedge isn’t easy.
This prevents bare plaster, plywood or foam from showing through gaps in the foliage. It also makes the vegetation look as though it is growing out of the landscape rather than sitting on top of it, which is a common beginner’s mistake.
If you’re using loose scatters as your base, you’re going to need to fix this down too; trying to glue your foliage to loose material is going to be a source of much frustration. For this, we recommend either applying PVA or scenic glue to your baseboard first, with a paintbrush. Or, fix it in place afterwards with something like Deluxe Materials Scenic Spray Glue (AD54) afterwards and let it dry thoroughly.
Step 2: Tear the Foliage into Irregular Pieces
A lot of it can probably be used straight from the packet if you want dense, chunky vegetation. But for embankments & trees, just tear off smaller, irregular pieces with your fingers.
Tearing is better than cutting with scissors because it creates softer, more natural edges. Cut edges can look square or artificial, which is fine for a neatly manicured garden scene, but then there are other products available for that. Plus, neat cuts will stick out like a sore thumb when you take a close-up photo of your scene. For N gauge, use very small pieces. A 10-foot-tall bush would only be 20mm (just under an inch high). For OO and HO gauge, small to medium pieces usually work well. Again, a 10-foot-tall bush would be 40mm. For O-gauge and larger dioramas, larger clumps can be used, but they should still be shaped and blended carefully.
Step 3: Test the Placement
Before glueing anything down, place the foliage loosely on the layout and view it from normal operating angles. This is especially important on model railways, where scenery needs to look right from the front of the layout rather than only from directly above. Do that thing of getting down to “little person level” and have a look at how the scene would look if you were a real person standing next to the hedge… Does it look real?
Check whether the foliage blocks important details such as signals, figures, buildings, signs or trackside equipment and that nothing will foul on a passing train. A little overgrowth can make a scene feel realistic. This is where we could get really clever, actually… a hedge along a main road will often have been “trimmed” by passing traffic… like the tops of lorries and buses. Again, pay attention to things like this when you’re out and about.
Step 4: Apply Glue
For most ground applications, PVA glue, white glue (Anita’s Tacky Glue), scenic glue or matte medium like Mod Podge will work well. Apply the glue to the layout rather than soaking the foliage completely. Press the clump gently into the adhesive and hold it for a moment.
For steep banks, tree armatures or vertical surfaces, use a tackier adhesive so the foliage does not slide out of position while it dries. See our best scenic glues for model railways guide.
Step 5: Blend the Edges
Once the foliage is glued down, blend the edges into the surrounding scenery. While you did much of this in step 1, there’s now the opportunity just to add a little extra to a scene, and this step makes a big difference to the final result.
We’ve used static grass tufts from Woodland Scenics and WWScenics, stinging nettles from Gaugemaster and random bits of foliage from the bottom of the bag to blend a tall hedge into its surrounding scenery. This bit is particularly enjoyable as you see things come together before your very eyes.
You can also break up anything that looks too uniform in colour with the addition of a little lighter coloured fine flock or turf scatter. This is great for simulating new growth in spring & summer.
The aim is to avoid the look of separate green blobs glued to the layout. Think layers…
Step 6: Seal the Foliage
The final step is to seal everything in place. On many layouts, while the foliage will look soft… if you actually touched it (with permission), it would be rock hard! That’s because it’s usually had at least one or two coats of a scenic spray glue to seal it all in place. Again, Deluxe Materials Scenic Spray Glue (AD54) is ideal for this. Or you can dilute good old PVA down (probably around 5 or 10 parts water to 1 part glue) and apply it with a spray bottle (an old kitchen spray bottle will work fine for this).
Do not oversaturate the area. Take it steady. Several light applications are safer than one heavy soaking.
Choosing the Right Colour of Clump Foliage – Match The Seasons
Colour choice has a big impact on realism here. Many layouts use too much bright green, which can make scenery look toy-like. There are some REALLY bright green foliages on the market, which, when used on their own, just don’t look realistic. Real vegetation contains a wide range of greens, browns, yellows and shadow tones.
- Light green is useful for spring growth, fresh shoots and highlights.
- Medium green is a good general-purpose colour for summer foliage.
- Dark green is useful for shaded areas, dense hedges, woodland edges and background vegetation, or late summer when colours have matured.
- Conifer green works well for evergreen trees, darker shrubs and upland scenery.
- Olive, burnt green and brownish tones are useful for late summer, dry grassland, scrub and neglected scenery.
- Autumn mixes can be used for seasonal layouts, woodland floors and late-year dioramas.
For the best results, mix two or three shades together. Even a small amount of colour variation will make bushes, hedges and tree canopies look more natural.
Best Places to Use Clump Foliage on a Model Railway
Clump foliage works almost anywhere that natural growth would appear. Some of the most effective locations include:
- Railway embankments and cuttings
- Tunnel mouths and portals
- Bridge abutments
- Retaining walls
- Fence lines and field boundaries
- Country lanes and rural roadsides
- Station gardens and allotments
- Riverbanks, ponds and drainage ditches
- Goods yards and disused sidings
- Woodland edges and backscene transitions
It is also very useful for hiding joins. If there is an awkward gap between a building and the ground, a bush can disguise it. If a road edge looks too sharp, a strip of rough vegetation can soften it. If a backscene meets the baseboard too obviously, a row of shrubs or trees can help blend the transition.
Good scenery often tells a story. A neat hedge suggests maintenance. A rough hedge suggests farmland. Bushes around an abandoned siding suggest neglect. Dense greenery around a tunnel mouth suggests a damp, shaded cutting. Think about why the vegetation would be growing there, not just where you need to fill space.
Common Mistakes to Avoid
- Using only one colour: Real vegetation contains highlights, shadows, stems, dead leaves and seasonal variation.
- Placing bushes too evenly: Nature is rarely tidy unless you are modelling a formal garden or maintained hedge.
- Forgetting the ground underneath: Clump foliage looks better over earth, grass, scatter or textured ground cover.
- Not using enough glue: Loose foliage can shed over time, especially on portable layouts and handled dioramas. Make sure you fix it properly in place with a scenic spray glue!
Pro Tips for Realistic Clump Foliage
- Mix several shades of foliage in a small tub before applying it. This will give you an idea of how the colours are going to look side by side.
- Use darker foliage behind lighter foliage to create depth and add the effect of mature growth at the back of the scene.
- Add tiny dead branches or twigs to hedges and bushes. It’s amazing what you can find in the garden.
- Use clump foliage to disguise awkward scenic transitions. It’s great for softening joints between buildings and baseboards.
- Place vegetation where water, shade or neglect would encourage growth. Let it overhang and stream, river or path.
- Keep foreground bushes more detailed than background vegetation. There’s no need to detail everything.
- Add static grass, weeds or flowers around the base to blend everything together. It’ll soften the lines.
Clump Foliage vs Other Scenery Materials
| Material | Best Used For | Main Limitation |
|---|---|---|
| Clump foliage | Bushes, hedges, shrubs, tree canopies and rough vegetation | Can look bulky if used in pieces that are too large |
| Fine turf or scatter | Ground colour, moss, low vegetation and blending | Too flat for most bushes |
| Static grass | Meadows, verges, lawns and long grass | Needs an applicator for the best upright effect |
| Lichen | Loose shrub shapes and tangled natural forms | Can look coarse or dry if not blended |
| Foliage mats | Broad leafy coverage, trees and banks | Can look uniform if not teased apart |
| Leaf scatter | Detailed leaves, forest floors and close-up realism | Usually needs another material underneath |
These materials work best when combined. A realistic embankment might include earth scatter, static grass, clump foliage, fine turf, weeds, flowers and a few small trees. The variety is what makes the scene believable.
Recommended Tools and Materials
- Clump foliage in two or three colours – think about the season and get yourself two or three shades
- PVA glue, scenic glue (Woodland Scenics S190 Scenic Glue), matte medium or Anita’s tacky glue
- Tweezers for placing small pieces
- A cocktail stick or small brush for applying glue to small places. Ideal for poking things under a hedge or bush
- Fine turf, earth scatter or soil texture (Woodland Scenics would be our preferred choice)
- Static grass or grass tufts (Woodland Scenics or WWScenics)
- Spray adhesive or diluted matte medium for sealing – PVA mixed 10:1, and with a drop of washing up liquid works well. Let it dry thoroughly, though. Otherwise, we highly recommend Deluxe Materials AD54
- Tree armatures (Woodland Scenics), wire frames made from old electrical flex, seafoam (can be expensive) or twigs for trees
- A small tray or tub for mixing foliage colours
You do not need every material at once. A simple bag of medium green clump foliage, some PVA glue and a little scatter is enough to begin experimenting.
Troubleshooting
Why does my foliage look like a bright green sponge?
There’s a wide array of colours available, but remember… Mother Nature doesn’t like to shout about much. Yes… Flowers are all manner of wonderful colours. But foliage tends to be muted greens apart from early spring (April to June) when growth is vigorous. Even then, it’s a rich, healthy green, not artificially bright. Take a few photos of a scene you’re trying to model, then compare it to the shades available in your local model shop or online.
How to fix foliage that dried with visible glue spots
It’s possible that no matter how hard you try, you’ll end up with a few areas of visible glue once it’s dried. There are a couple of ways to remedy this… a quick spritz of Scenic Spray glue, then a sprinkle with some fine foliage or a few crumbs of clump foliage will soon sort it. Or you can apply tiny drops of fresh glue to hold additional clump foliage in place to cover it up.
My foliage is still loose, how can I fix it?
If you’ve given it a spray of scenic glue, there’s no harm in an additional few coats. Most good proprietary spray glues all dry matte, so you can afford to be quite liberal with it. If you’re allowed to touch any foliage on a layout at an exhibition, you’ll find that most of it is rock hard because it’s been doused in multiple coats of glue.
Conclusion
Clump foliage is a simple material, but it is one of the most useful scenic products for model railway layouts and dioramas. It’s a really quick way to add volume, texture and natural shape in a way that flat scatter or paint cannot achieve on their own. Used carefully, it can represent anything from small garden bushes to huge roadside hedges, to gorse and brambles.
Whether you are building your first layout or refining a detailed diorama, clump foliage is an easy way to make miniature landscapes feel more alive, more natural and more realistic.
Further Reading : Find Out More About The Woodland Scenics Clump Foliage Range